Printing at Aalto University
The installation of the new Ricoh multifunction devices began on campus in November.
You can now log in to the new Ricoh multifunction devices with your Aalto username and password, as well as with your access card (from 14 November, 2024 onwards). You do not need to register your access card at the printer; it will work automatically. The Bitwards Mobile ID does not work for printer authentication. Read below for instructions on how to authenticate with an access card.
Mobile printing is now available also for the new Ricoh devices (from 14 November 2024 onwards). See below for a link to the instruction page. To use mobile printing, send your file as an email attachment to [email protected]. NOTE: Color printing is currently not working with mobile printing in the Ricoh printing system. The issue is known and is being investigated.
With the introduction of the new Uniprint printing system, the printer support services will be transferred to Unigrafia.
Print your jobs on both sides of the paper whenever you can, and use electronic materials to avoid unnecessary printing.
During the change from the Canon printing system to the Ricoh printing system this page will include information on using both systems. In the beginning of the page you can find information on using the new Ricoh multifunction devices. Below in the page you can find the older instructions for using the Canon printing system.
Aalto University's new Uniprint printing service: Quick Guide
1 Identification
- Starting from 14 November, you can log in to the new Ricoh multifunction devices with either the Aalto username/password combination or with your access card.
Unlike the old printing system, cards other than your access card will not work with the new system. Registering a card on the multifunction device is not possible.
If you already have an access card, it will work automatically for authentication without any additional steps. - If you do not have an access card, only have an HSL card as an identifier, or only use Bitwards Mobile ID, please see the instructions for obtaining an access card at How to get an access token and access rights.
- Bitwards Mobile ID does not work for authentication with the multifunction devices.
2 Printing to multifunction devices
- The AaltoPrint queue is automatically installed on Aalto University workstations.
- Remember to restart your computer within the Aalto network!
- If you cannot access the queue, installation instructions can be found on the next page.
3 Installing a network printer
- See instructions below
4 Mobile printing and email printing
- See instructions at Mobile printing.
Contact and Support
If you encounter technical issues with the printing service setup, you can contact Aalto IT Service Desk:
- Email: [email protected]
- Phone: +358 50 513 2000
Questions about device placement, quantities, usage, or the service in general?
- Unigrafia printing service support: [email protected]
- Service website: www.uniprint.fi
- Phone (9 am - 3 pm): 09 701 0230
Installing a network printer on an Aalto University Windows workstation
- Open the Start menu and search for Printers & scanners.
- Select Add a printer or scanner.
- Then click The printer that I want isn’t listed.
- Choose Select a shared printer by name and enter in the field below: \\print.org.aalto.fi\serial number (the serial number can be found on the device label) > Next.
- The printer is now added to the workstation.
NOTE: The network printer can only be installed on an Aalto workstation. Network printers cannot be installed on workstations that are not centrally maintained by Aalto IT services.
If your workstation is not under centralized maintenance, please use mobile printing ([email protected]). Please note that printing to the AaltoPrint print queue is only possible from Aalto's workstation network. For instructions on mobile printing with the new Ricoh devices, see the Mobile Printing page.
With the old Canon multifunction devices use the [email protected] email for mobile printing.
Installing the AaltoPrint queue for multifunction devices on an Aalto University workstation
- Open the Start menu and search for Printers & scanners.
- Select Add a printer or scanner.
- Choose AaltoPrint and install it.
- Make sure the queue appears as a new printer in applications like Word.
Installing the AaltoPrint queue on an Aalto University Windows workstation, if automatic installation fails
The AaltoPrint queue is automatically installed on Aalto University workstations. Generally, the user does not need to do anything.
If the AaltoPrint queue was not automatically installed on your Windows workstation:
- Open File Explorer
- Go to the network location \\print.org.aalto.fi
- Double-click AaltoPrint or right-click and select Connect.
If the AaltoPrint queue was not automatically installed on your Mac workstation, please contact IT Service Desk ([email protected]).
Mobile printing (with Ricoh multifunction devices)
See the Mobile printing page.
FAQ
You can print documents at Aalto University with a personal printing card (HSL, Frank/Lyyra, Unigrafia’s printing card). Staff members: if you don´t have a printing card, you can get one from IT Service Desk
Print your jobs on both sides of the paper whenever you can, and use electronic materials to avoid unnecessary printing.
Printing quotas:
Students: 200 pages per quarter of a year (black-and-white pages, size A4 or A3). Staff members: 500 pages per quarter of a year (black-and-white or colour pages, size A4 or A3) Others (such as visitors): printing and copying rights are handled on an individual basis.
Colour printing for students: After the change to the Ricoh multifunction devices only ARTS students will be able to print in colour. .
Registration of a printing card
A printing card can be registered by means of PrintingPoint devices or Secureprint devices used by staff members.
- Go to the nearest PrintingPoint device or a Secureprint device used by staff (see the list of printer locations below).
- Show the reader in the printer the card you wish to register as a printing card (such as an HSL travel card, Frank (former Lyyra) student card, or a separate Unigrafia printing card that can be purchased at Unigrafia’s offices).
- Log in to the device with your Aalto ID.
- The card in question now functions as your printing card.
Note! If you lose your printing card, register another one and the lost card will be useless.
Printing
All Aalto University printing devices that have a card reader can be found in the network, under the name SecureprintPS (or secureprintpcl or secureprint). Standard printouts are always black-and-white.
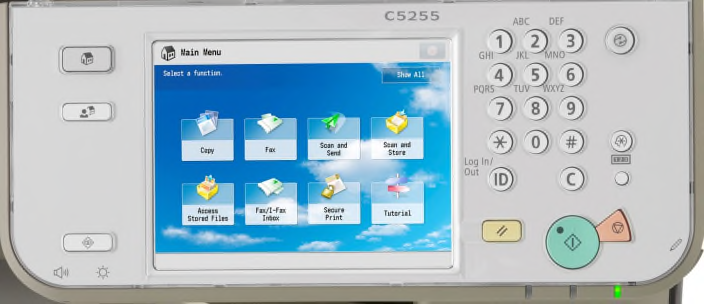
You need to go to one of those printers and login to the printer with your Aalto credentials / Printing card and release the job from the queue, after this the document would be printed.
Unprinted jobs will disappear from the queue after 12 hours.
A PrintingPoint device is a printer, so stapling or any other post-processing is not possible.
- From the printing menu, select SecureprintPS print queue.
- After you have printed your print job to the SecureprintPS print queue, you can pick up your printout from any PrintingPoint device.
- Show your printing card to the printer, and you will see your own print jobs as a list.
- Select the jobs to be printed from the list and change the settings, if necessary, before selecting Print.
- The device will print your job.
- Log out of the printer.
Printing without a printing card
If you do not have your printing card with you, you can enter your Aalto University username and password on the printer’s touch display and log in. If you register another card as a printing card, the original printing card will not work anymore. The device only accepts one active card as a printing card.
Mobile printing
Students and staff members at Aalto University who have a valid Aalto email ID can also use mobile printing tools.
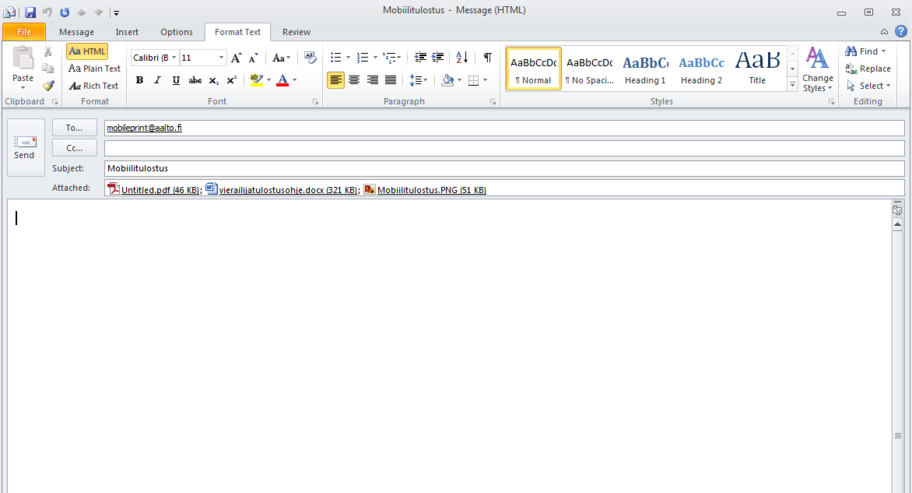
1. Log in to Aalto University’s email and select New Email.
2. Attach the document(s) you want to print as an attachment to the email message (acceptable file formats: .pdf, .doc, .docx, .xls, .xlsx, .jpg, .txt, .ppt, or .pptx), or directly to the email’s message field (in such case, select the HTML or Rich text format). The maximum size of documents that can be printed is 50 MB. If there are several attachments, they are processed as separate print jobs.

3. You do not have to write anything in the message field, because any email message is also processed as a separate print job.
4. Send the email message and attachments to [email protected], the heading of the message is optional.
5. You can see the print jobs sent from your mobile device in your ordinary secure print queue. Identify yourself with your printing card for the card identification device and release the job(s) of your choice.
The printer asks you to add paper, but there is already paper in the device
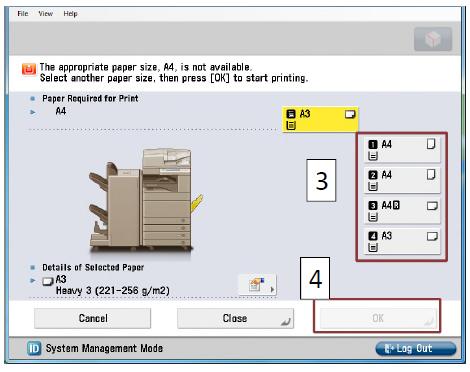
If the printer asks you to add paper but there is already paper in the device, make sure you have selected the correct paper size.
You can print the document by changing the paper size on the printer’s display:
1. If the orange warning light is flashing (2). Press Monitor Key (1).

2. Select the correct paper size on the display (3) and press OK (4).

Related instructions
Adding a printer (Windows)
Classroom computers maintained by Aalto IT have a printer pre-installed, but at the various departments users must install a printer on a workstation.
Printing with Canon multi-function devices (Mac and SecurePrint)
The printer queue and its drivers are automatically installed on OS X 10.7 and newer Mac computers in maintenance by the IT Services, so you do not have to worry about the deployment of the printer queue.
Printing with a SecurePrint queue from your own Linux computer
Printing from your own Linux computer to Aalto University’s printing server can only be done from trusted networks (wired networks and Eduroam, for instance).
Printing in Aalto's Linux
A print queue called secureprintps has been added to Aalto University’s Ubuntu workstations and general servers, which is the default printer on most computers. When you want to print something, select secureprintps from the printer menu.
Locations of printing devices (PrintingPoint)
See where you can find the PrintingPoint devices.
IT Services
- Published:
- Updated: